Crabbing Community
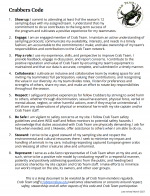
Crabber’s Code
Crab Team monitors and staff worked together to develop a set of community agreements guiding our work together. Read the code by clicking below, or read more about how the code was written on our blog.
COVID-19 Safety
As of Oct 31, 2022, UW released updated guidance about how COVID-19 safety policies affect university volunteers (Crab Team volunteers are considered UW volunteers) with the expiration of the Governor’s Emergency Order. The vaccination requirement is no longer in effect for UW/Crab Team volunteers.
Crab Team can no longer require volunteers to adhere to COVID safety precautions, including masking, testing, or reporting. However, we strongly recommend that teams continue to exercise transparent, proactive communication with each other, and practice a high degree of caution around COVID safety, including masking, testing, and staying home/rescheduling sampling if symptoms are present.
We have recorded presentations describing each of the protocols in detail that you can review when you wish. Several have review questions at the end to help assess your knowledge. A video also summarizes the protocol and demonstrates some of the field conditions.
Protocol Presentations
1. Introduction and Guidelines
2. Trapping
3. Molt Hunt
Scheduling Monitoring Dates
Use this decision tree linked here to help you schedule monitoring dates based on your team’s site characteristics and tidal conditions.
We’ve created a number of resources to help you identify the organisms you’re likely to find as a part of monitoring with Crab Team. Many are available on the Identify Green Crab page, including a video tutorial by Sean McDonald. As always, we are available to help you identify everything you find while surveying. If you have questions, take several photographs from different angles, and something in the photographs for scale, and email us at crabteam@uw.edu.
Additional ID Resources
-
- Similar shore crabs:
- Male versus female crabs: Crabdomen Guide
- Sculpin Identification Slides
- Sculpin Comparison Chart
- Shrimps: Introducing PAMA
- Snails: Crab Team Snail ID Guide
Tricky ID Flashcards
These decks of flashcards are designed to help you learn to quickly distinguish among easily-confused species of crab. Read more about how we designed them.
Where and when do I submit data or data sheets?
Please submit data gathered each month electronically (as below) within a week of completing sampling. After your final sampling for the season, please mail us the hard copes of the data sheets in the brown, pre-addressed envelope you received them in at the beginning of the season. In case that envelope is no longer available, use the general WSG mailing address:
Crab Team
Washington Sea Grant
3716 Brooklyn Avenue N.E.
Seattle, WA 98105-6716
To submit data electronically each month:
- Verify completeness of data sheets. Check that site metadata and volunteer hours are all completed. Ensure each row in the trapping data sheet is clearly totaled in the correct column. If you have questions about species identification, please get these answered before you submit your data sheets, so the data submission is fully complete.
- Scan or take a photograph of data sheets. Your phone is often adequate for this, but quality can often be improved (and file size decreased) by using a scanner, or a scanning app on your phone (like Scanner For Me). Open all the photographs before sending
- Rename files according to the convention. This might require transferring files to your computer, as not all phones allow you to rename files. All files should follow the basic format:
- Site Number
- Year (two digit, e.g. 17)
- Month (single digit, e.g. 6, rather than 06 for June)
- Content, either “Trap”, “Transect”, or “Molt” for data sheets, and trap type and number (corresponding to photo card) for trap photos.
- Examples: 333.17.6.Trap.pdf 333.17.6.Minnow.1.jpg
- Email all images to crabteam@uw.edu. Multiple emails are fine if necessary. File sharing websites like Google Drive and Dropbox also work for us. Make sure that if you have the chance to select the file size for photographs, that you choose at least “Large”. Selecting Medium or Small will result in pictures that are too low resolution to see details necessary for species identification.
"How do I get more ______?"
We try to provide you with everything we think you will need at the beginning of the trapping season. Sometimes, however, you just run out of something, or data sheets are destroyed by the mud. We will do our best to replace any gear you have run out of. Just try to give us enough time to get it to you. If there is some piece of equipment that would make your monitoring easier, drop us a line, and we’ll see what we can do.
How do I decide what time to schedule monitoring?
A basic outline of the important things to think about when scheduling monitoring is included in the Volunteer Handbook (above). Shoreline surveys can be conducted any time that the tide is low enough to expose the habitat boundary and you will need to think about the tide cycles for trapping surveys. In either case, the key piece of information is knowing the tidal elevation your site. In particular consider the height of your habitat boundary and the height of your traps. Then looking at a tide chart will help you plan. A good website for tide charts is NOAA Tides and Currents, and TideGraph is an excellent app for iOS. Any time that the tide is predicted to be lower than either your habitat boundary or your traps, they will be exposed and you can monitor.
Ideally, you want to make sure the traps are submerged in water for the entire time they are set, so that (1) they are always fishing, and (2) any live organisms are constantly kept in water and will be in good condition to be released. So, you will need to first check that the second low tide of the day won’t drop low enough to strand your traps high and dry and unattended, which could provide an opportunity for raccoons and opossums to find them and try to go fishing themselves. You’ll also need to plan to return to the site in time to process all the trap contents as the tide drops. This planning is easier if your site retains some water on even the lowest tides, like a lagoon or a deep channel, and we’ve tried to select sites where this is the case for that reason. If this is the case at your site, you will have more flexibility about when you can return.
Additional Tools:
- “Stoplight” calendars show you the best days for sampling based on tides for your region, and use tidal benchmarks that should enable you to keep your traps under water while off site. You’ll still have to look at a tide chart to select a time and double check the tides work at your particular site. Check in the Monitor Toolbox for tide calendars for your region.
- Scheduling polls: Once you have days and times that will be suitable for sampling, you can query your group using a scheduling poll. Some we use are Doodle and WhenisGood.
How do I record a species I can't identify?
Our ID Guide (above) has many of the species that we think you are likely to see in your traps and molt surveys. However, every site will be different, and we can’t list absolutely everything. In addition, some groups, like sculpins, can be really hard to tell apart because there are many similar species. Part of our goal in this project is to have the highest quality dataset possible. With that in mind, we are always trying to identify every organism to the species level. If you find an organism, but aren’t sure what it is, contact us. We love playing Sherlock and trying to solve puzzles of mystery organisms! Take several photos from different angles and levels of magnification, and include some item for scale so we can see how big it is. If it is a molt that you can’t identify, you can actually keep the molt so we can get the specimen from you to be 100% positive.
On your data sheet, you can use a place holder, such as “Unknown species A/B/C/etc.” until we can figure out what the organism is. Then we can provide you with a species code to enter on your data sheet. Thus, don’t email us your data sheets until you have identified all the organisms to the species level. If you know the species, but it’s not on our sheet, you can still figure out the species code, remembering that the four letters come from the scientific name of the species, the first two letters of the Genus name and the first two letters of the species name: CAMA is CArcinus MAenas. But it’s probably good to write out the entire name for us as well.
What do you mean by selecting crabs "haphazardly"? Why does it matter?
Haphazard sampling, which is distinct from “random” sampling in the strict sense, is a common feature of many ecological studies. It is a practice that attempts to balance statistical rigor with field practicality, and reduce both human and crab bias in determining which crabs get measured. Reducing these biases is the best way to be sure that the subsample of crabs we measure closely matches the true sizes of all the crabs in each trap.
The short answer about the best way to do it is:
- Close your eyes (reduce human bias),
- Gently mix the crabs in the bin (reduce crab bias),
- Select the first one that you grab and measure it.
Caution: You might want to modify this if you are dealing with larger, “pinchier” crabs!
For a (much more than you ever wanted) detailed explanation of why we do it this way, read the Protocol in Focus from the Crab Times Winter 2016 Volunteer Edition.
Is this crab a male or a female?
In general, females have wide abdominal flaps for carrying eggs that distinguish them from males. But in some cases it’s harder to tell than others. One particularly confusing scenario occurs with hairy shore crabs (Hemigrapsus oregonensis, HEOR) which can be infected with a parasitic isopod that feminizes the males – that is, it causes the males to look more like females in the shape of their abdominal flaps – read all about it in our Protocol in Focus piece on this parasite. Depending on the crab species, distinguishing between the abdomen flap size can be tricky, so we’ve created this handy Crabdomen Guide and a Protocol in Focus article all about distinguishing between crab sexes.
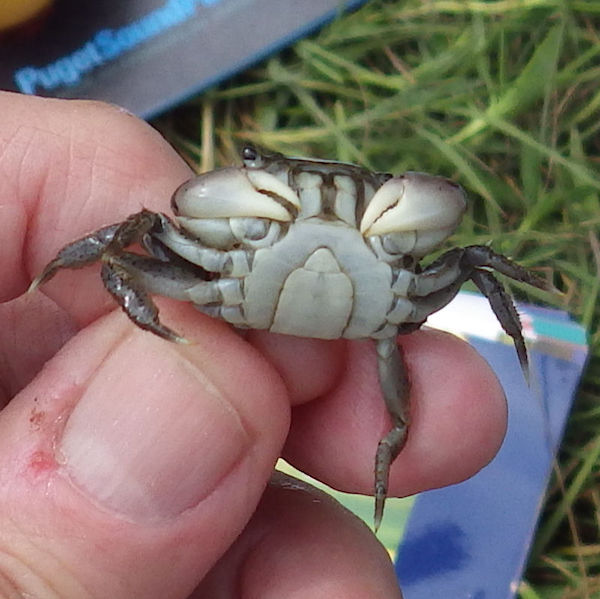
Wider than a typical male, narrower than a typical female. This crab is a male infected with a parasitic isopod that feminizes the crab. Record as if it were a male, but note in the comments section.
If you come across a HEOR that doesn’t quite look like either male or female, assume it is a “feminized male”, and count it as a male. Record the carapace with (if it’s one of the 10 you haphazardly select to measure) in one of the 10 boxes, and include it in the total number of males for that trap. Though not required, you’re welcome to make notes of any feminized males you catch in the notes section for that trap.
As always, if you aren’t sure what you are looking at, take good notes and send us several close up photos to ID for you. Please send us these photos and questions before you submit your data, so the data sheet you submit is complete.
How do I know if it's a molt or a dead crab?
Though it may seem like an easy distinction, sometimes it can be tricky to discern whether the shell in your hand is a molt or a dead crab. To help you get to the bottom of it, we’ve outlined four questions you can ask yourself – Find more details about what to look for in this Protocol in Focus piece .
- Is there any obvious trauma? Some predators will leave specific clues behind after munching on crab shells. Looking for these clues may help you distinguish between a molt or a dead crab that met an unfortunate demise.
- How heavy is it? Molts are typically much lighter than dead crabs with tissue still in-tact.
- Does it open? Because molting crabs essentially climb out the back of their shells, the shell of a molt should easily open on a hinge (much like a jewelry box). If it’s hard to open, it’s likely a dead crab.
- What’s inside? Molted shells should be quite clean inside, while dead crabs may contain goo or crust of internal tissue. Remember that feathery gill tissue appears in molts too.
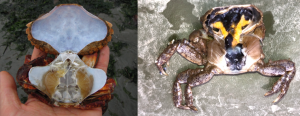
A molt (left) will have a clean shell interior, and open like a jewelry box hinging at the eyes. A dead crab (right) may be filled with “goo” of various colors in the middle section of the shell and attached to the inside of the carapace. Note that both crabs appear to have gills, while the molt actually only has the molted coverings of the gills. Photos Jeff Adams and Emily Grason
If you come across a shell that you’re not sure about, take some notes on your molt data sheet and snap some close up photos from different angles. Send them our way, and we’ll help you make the call. Please remember to send us these photos and questions before you send us your data, so that your data are complete upon submission.
Why do we use two types of trap?
The minnow and Fukui traps target different sizes and shapes of organism. The minnow trap has a smaller opening and mesh size, meaning it catches smaller critters than the Fukui. We use both traps because we are trying to get a snapshot of everything that lives in pocket estuaries. “Zeros” are also very important data points in our sampling scheme. So, even if we come up with empty Fukui traps, we are learning something: that there are no large crabs visiting that site. If we only used minnow traps, we would never be able to tell whether or not large crabs were present.
For a more detailed explanation, check out our blog post on this topic.
What is "Live Epifauna"?
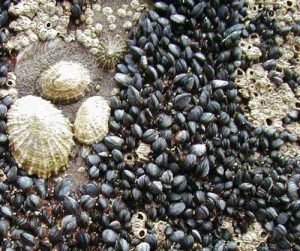
Limpets, mussels, and barnacles all count as epifauna
In 2016, we added the category of “Live Epifauna” to Step 2 of the quadrat estimation. We ask what percent of the space is taken up by live epifauna, which means animals living on or attached to the surface. This could be mussels, barnacles, snails, limpets, chitons; our rule of thumb is if it can’t move fast enough to leave the quadrat while you are observing it, it gets counted as live epifauna.
For more information on how to distinguish live epifauna from dead epifauna, and what we can do with these observations, read our Protocol in Focus on the topic.
What happens to my data after I submit it?
Wondering what happens to all the valuable-as-gold information you collect each month after you click “send”? Read all about it in this Protocol in Focus blog post.
Why do we use mackerel as bait?
Believe it or not, quite a bit of thought went into what type of bait we would use for monthly Crab Team monitoring. Read this Protocol in Focus blog post to learn more about how we landed on mackerel as our bait of choice!
How can we be good stewards of Crab Team monitoring sites?
In addition to creating a scientifically robust sampling scheme, and one that is sensitive to finding green crab when they are rare, Crab Team also put a great deal of thought and guidance into the protocol with the goal of being good stewards of Washington’s shorelines. Even though our goal is to detect green crab as they first arrive and help avoid ecological damage, it is certainly true that the act of sampling itself can be a disturbance to a site. Repeated visits to muddy habitats can trample vegetation over time. Being caught in a trap can be stressful for the native crabs and fish. Multiply this by 56 sites, six times per year over successive years, and the cumulative effects, if we weren’t careful, could be substantial, and even reduce the resilience of sites to green crabs.
Read this Protocol in Focus blog post for our list of site stewardship best practices to be a great stewards of your site! Following all of these tips helps ensure that we can continue to monitor our Crab Team sites in the years to come.
Why do we measure European green crabs?
European green crab size provides information like their age and their ecological role at the location they were trapped. Knowing the size/age of green crabs helps researchers understand invasion timing, population structure, population forecasting, as well as predation impacts. You can learn more about these topics and more in this Protocol in Focus blog post!
Why do we measure native crabs?
It is a crab eat crab world, so knowing the size of native crabs in addition to the size of European green crabs helps us predict what the outcomes of these interactions could be. All crabs start out as small larvae, even the crabs that end up much larger than green crabs, so there are quite a few size-dependent green crab interactions that you can read more about in this Protocol in Focus blog post!
Why is taking good bin photos important?
Your bin photos may feel as easy as the click of a button, but they are the essential step in the protocol that allows the Crab Team dataset to be used by researchers. Namely, they are the tool for validating all your findings in our data QC process. Read more about in this Protocol in Focus blog post!
WSG Crab Team Pro-Tips
After a decade of monitoring Washington’s shorelines for invasive European green crab, Crab Team monitors are seasoned pros. In fact, many have developed tricks to help make the process more accurate, efficient, and fun! As WSG Crab Team HQ travels around the Salish Sea for returning volunteer trainings each March, we crowdsource these different ideas with the goal of creating a resource that we could share with all of Crab Team. The following “WSG Crab Team Pro-Tips” are the result of those efforts; a set of tips and tricks that teams have put to use at their sites and could be useful at your own sites. As always, if you have any pro-tips of your own that you don’t see on this list, don’t hesitate to send them our way at crabteam@uw.edu.
Gear
Sticky minnow traps? – In addition to giving them a thorough rinse, store minnow traps with old newspaper in between each half so they’re easier to pull apart. Still stuck? Roll the minnow traps, rock them back and forth, and twist them side to side rather than pulling straight up to get them unstuck.
Volunteers at Spencer Spit exhibiting one of the many uses of a 5-gallon bucket: seats!
5 gallon buckets do it all! They are great for carrying water for rinsing things, as seats, for carrying gear, and for helping you get out of the mud.
Clunky calipers? Spray the metal rod on calipers with cooking spray or another oil to make it easier to slide them open.
Heaps of HEOR? Bring extra dish tubs to make the process move faster, especially if you have a large team. One group can separate sexes from one trap while another group is still measuring from the first trap. A dedicated blue bin for the males, a dedicated pink bin for the females, and one additional bin (for anything not a hairy shore crab) can make the sorting process easier. On the side of the bin, try attaching a thumb clicker with velcro so you don’t have to keep a running tab, you just have to check the number on the clicker at the end.
April showers feeling chilly? In that first cold monitoring month, wear neoprene to help keep you warm (just make sure to rinse thoroughly afterwards).
Mired in mud? If it’s appropriate at your site, you can lay 2” x 4” boards down at particularly muddy areas to help prevent getting stuck. Be sure to remove these from the site when you are finished for the day and avoid damaging any vegetation.
Traps in the deep? Bring a tree pruner, garden rake, or gaff to grab the trap. Be careful not to rip the mesh of the Fukui traps as you pull them up, though. Garden rakes can also help you maintain balance and get out of the mud if you’re stuck.
Messy Mackerel? Several days prior to trapping, partially thaw your bait and load it into bait containers, then refreeze. When you thaw it again for monitoring, the bait will be preloaded which will save you time (and ick) at the site.
It’s the little things. Prep a Ziploc baggie with extra small supplies (trap clips, zip ties, pens/pencils, etc) and keep it with your data sheets so it’s easily accessible.
Muddy waters? A sieve from a worm bin, or similar, with small holes can be used to rinse critters before putting them into tubs. This helps pictures come out more clearly.
Feeling ambitious? One team designed the ultimate Crab Team tool by converting a garden cart into the “Crabbin Wagon”, an all terrain mobile monitoring system! Check it out:
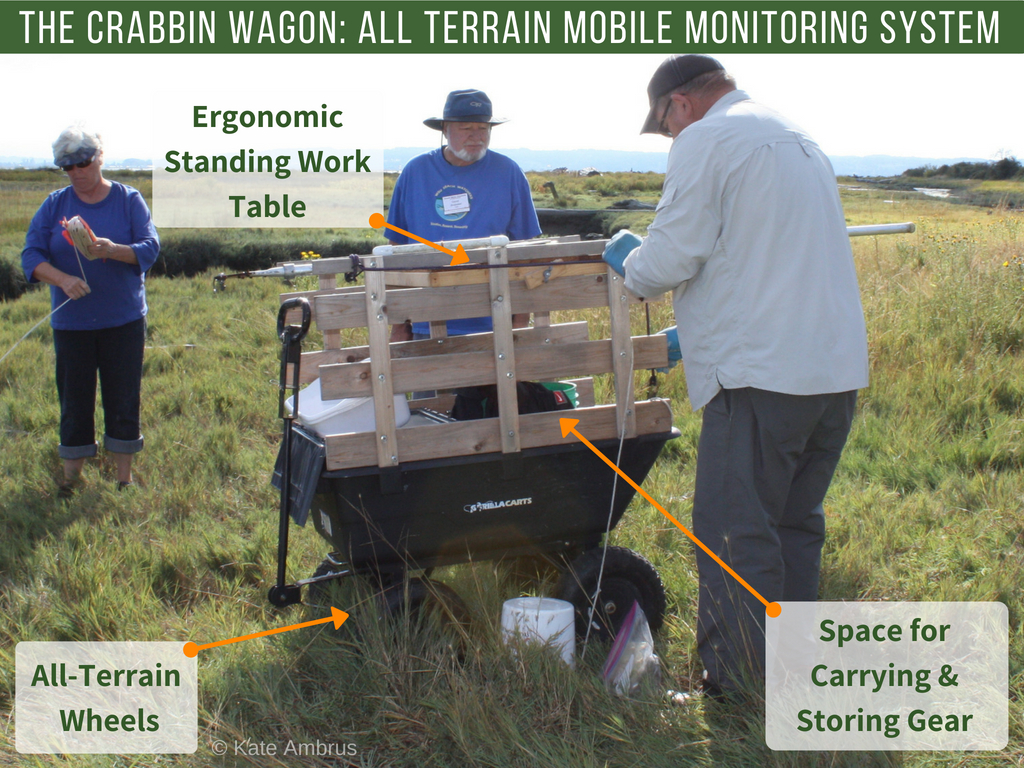
Click to enlarge.
Critters
Helping with HEOR
- Having a hard time telling HEOR and HENU molts apart? If there is a groove or cleft in the middle of the rostrum, it’s a HEOR. If the rostrum is flat, it’s a HENU.
- One shortcut to sexing HEOR, at least in the large crabs, is the claws. If you see a crab with huge pinchers, it’s almost certainly a male. Smaller males and all females have relatively smaller claws, so anything with small claws needs a closer look. Practice guessing a bit and test yourself before relying on this shortcut, and double-checks never hurt, but it can save some time.

Fish inside of a Brita “photarium”. Take pictures through the flat sides to get a better view! Click to enlarge.
Crab Rodeo Most crabs in your traps will be small HEORs, but on occasion, a few larger Cancrid crabs like MEMA or CAPR will find their way into Fukuis, and this is more common at some sites than others. Safely handling large crabs solo while simultaneously measuring is a master level skill in crab wrangling. To learn how, check out our demo video.
Floundering Fish? If a fish you caught in your trap looks a bit…lethargic, try gently gliding it forward and backward through cool sea water. This moves oxygen over their gills and may help revive them.
What is it?! If you’re unsure of a species, take multiple pictures from different angles and with something else in the photo to provide a sense of scale. Then send the pictures to Crab Team HQ. This also is important if you catch something you’ve never seen at your site before – to verify unusual finds. If you’re unsure of the species of a molt, bring it home to spend more time IDing. Send photos to Crab Team, and keep the molt in case we need to see it in person to ID.
Hide and seek! If you think a shell is empty, there could be a grainy-handed hermit crab hiding in there because they choose shells that are much larger than their bodies. Leave the shell undisturbed for a little while to see if it starts to walk away. If a snail is in the shell, the opercular plate should be clearly visible.
Finicky fish: Photographing fish for ID can be tricky as different photos are needed based on the shape of the fish (top-down for sculpin and flatfish, side photos for laterally compressed fish). Repurpose an old Brita pitcher as a “photarium”, allowing for shots from both angles. The flat sides of the square version of the pitcher prevent distortion of the shape of the fish when viewed from the side. (Tip from Jim H. of Harper Estuary)
Data Collection/Submission
Tallying Tips: If you have large numbers of crabs, try counting them in sets of five or ten – after you have measured your first 10 males and 10 females. Tally them on a separate piece of paper, and then move the final number to your data sheet. You can also use an “X” to tally for 10, which saves space as well as time.
Teamwork Makes the Data-Collection-Dream Work! Having multiple people measure and count simultaneously can speed things up, but careful coordination is required
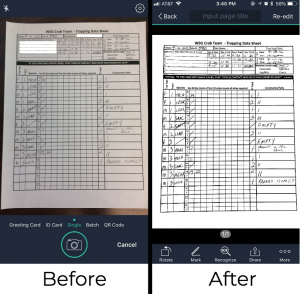
A data sheet before and after using CamScanner.
to keep from confusing the recorder. Try counting out five or ten of one sex a time (usually males) before announcing them to the data recorder.
Scan with your Cam: Having trouble getting good pictures of your data sheets? Smartphone apps like CamScanner allow you to scan documents just by taking pictures of them. Download the free app and give it a try. This also usually makes for more readable images and smaller file sizes.
ID Dilemma? Send photos of any unidentified critters to Crab Team HQ before submitting your data sheets. This way we can ID the critter for you, you can update your data sheet, and you only have to submit it once!
Teamwork
Make it a date. Lots of Crab Teamers enjoy making their monthly outings more social, often involving food!
- Go to a teammate’s house or a coffee shop after monitoring to count molts together.
- Wine and cheese on the deck is always a great way to celebrate a successful two days of monitoring.
- Meet for breakfast or brunch before heading out to your site.
Catch some rays. Make rain dates in case the weather has other ideas about your planned monitoring days.
Coordinate schedules like a pro. Every group has a different scheduling style: some groups prefer to schedule all their dates in advance while others schedule their monitoring dates each month as they go. Either way, there are great scheduling tools that you can use to find a time when everyone on the team can meet. Check out Doodle, When2Meet, or WhenIsGood.

Doodle is a great tool for figuring out when everyone on your team is available for monitoring.